
Quick guide to building a deck
Quick guide to building a deck
Building a deck is a common project – whether you hire a carpenter or build it yourself. Here you will find a quick guide to building a deck, focusing on the most important steps to watch out for.
Preparation and a stable foundation – the key to a long-lasting deck
A long-lasting deck starts with thorough preparation. A well-compacted gravel bed creates a stable foundation, and adjustable supports make it easier to create a level base. Once the foundation is level and the supports are correctly spaced, the rest of the build goes much more easily.
Tip: Always check that the base is level and sufficiently compacted. An unstable foundation will cause problems later.

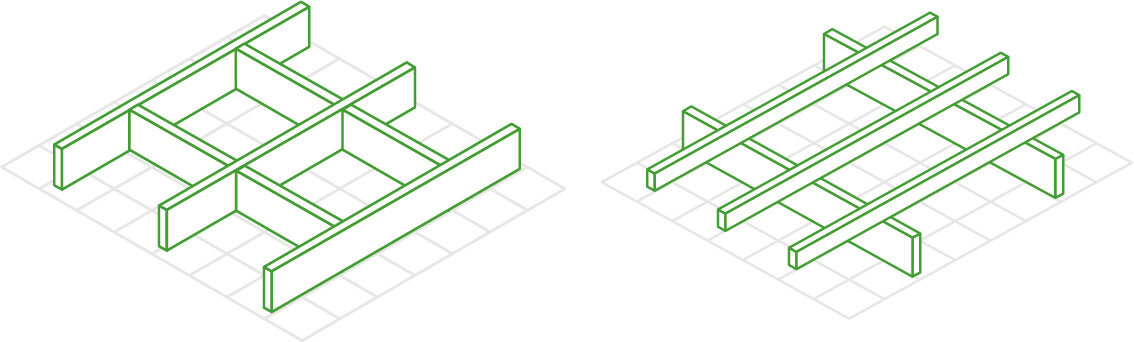
The substructure – the load-bearing structure of the deck
The substructure is the basis of the deck and must be both stable and accurate. Build it in modules and you will work more efficiently. You can choose between two types of substructure: crossed or flush. The choice usually depends on the height of the deck.
- A crossed substructure is the quickest to install, but it needs a little height under the decking boards to fit (shown on the right).
- If the deck is to sit close to the ground, a flush substructure is usually installed, in which the beams and joists cross at the same height (shown on the left).
You can join the substructure with timber engineering connectors and connector screws, or with construction screws.
Installing the decking boards – the deck takes shape
When the substructure has been built properly, installing the decking boards goes quickly and the result looks good. A few quick installation tips:
- Install the screws at the correct distance from the edge and end of the decking board.
- Countersink the screw so that it is flush with the decking board.
- If possible, lay the boards heartwood side up.
- Always lay the boards with spacing between the edges according to Svenskt Trä, so that the deck lasts.


A tip for an exceptionally luxurious look
With the ESSVE HDS system you can install your deck with hidden fixing – the screws are driven at an angle from the side, so the screw heads cannot be seen on the surface.
The HDS system consists of an installation tool (HDS PRO), stainless steel screws (A2 or A4) and decking spacers. A simple system for professionals and DIYers alike.
- Easy installation
- Luxurious look
- Smooth surface
- Lower risk of splintering and cracking
ESSVE decking screws
Install decking boards with hidden fixing using the Hidden Decking System (HDS), or screw them down from above with the premium ESSDECK Max screw or a standard decking screw.
 ESSVE Decking screw ESSDECK MAX 4.8 x 55 mm CorrSeal, pack of 250
 ESSVE Decking screw HDS Pro with drill point, hidden fixing 4.8 x 60 mm A4, pack of 250
 ESSVE Decking screw HDS Pro with drill point, hidden fixing 5.0 x 75 mm A2, pack of 250
 ESSVE Collated decking screw 4.2 x 42 mm A4, pack of 1000
 ESSVE Decking screw HDS 4.8 x 60 mm A2, pack of 250
 ESSVE Decking screw HDS, hidden fixing 4.8 x 60 mm A4, pack of 250
 ESSVE Decking screw ESSDECK MAX 4.8 x 55 mm A2, pack of 250
 ESSVE Decking screw ESSDECK MAX 4.8 x 55 mm A4, pack of 250
 ESSVE HDS Pro screwdriver for decking boards
 ESSVE Collated decking screw 4.2 x 42 mm CorrSeal, pack of 1000
 ESSVE Collated decking screw 4.2 x 42 mm A2, pack of 1000
 ESSVE Decking screw 4.2 x 55 mm CorrSeal, pack of 250
Step-by-step guide to building a deck
Ready to start building? See our detailed step-by-step guide to building a deck.