
Step by step – installing smaller windows with the frame screw L
Installing smaller windows with the frame screw L
Step-by-step guide to installing smaller windows and light interior doors with the frame screw L. Simple and convenient installation.
Frame screw L – installation guide
If you are installing smaller windows and lighter interior doors, the frame screw L offers simple and convenient installation. It is fitted in a single step and needs no special tools. The frame is easily aligned by screwing the frame screw in or out.
Installation guide
The ESSVE video shows frame installation with a frame sleeve. You will find the method with the frame screw L step by step, with text and pictures, below.
Before you start:
- Space the frame screws L approximately 500 mm apart.
- The frame must have stepped 14/5 mm holes – half of the frame thickness is drilled with a 14 mm diameter hole, the rest with a 5 mm hole. If the holes are missing, drill them with a drill bit for frame screws.
- Use the frame screw L with a sharp point in walls of wood, concrete, lightweight concrete, expanded clay aggregate concrete, brick and hollow brick. For steel profiles (max. 2.0 mm) with timber reinforcement, use the frame screw L with a drill point.
Video by the manufacturer ESSVE, without English subtitles.

Step 1: Make sure the frame is straight
We start by fitting the level screws as close as possible to the outer edges of the frame. The level screw ensures that the frame will be straight. Use at least two screws per window. If the window has a centre mullion, place another screw under it as well. When installing doors, more screws are needed at the bottom because the threshold will bear loads – the screws must therefore support it along its entire length.

Step 2: Fit the level screws
If the wall is concrete, pre-drill a 6.0 mm diameter hole about 40 mm deep and use a nylon plug N 6 × 30. Fixing into wood or into a steel profile (max. 2.0 mm thick) with timber reinforcement needs no pre-drilling.

Step 3: Position the frame
Stand the window frame in the opening on the level screws. The air gap under the frame should be approximately 15 mm. To centre the frame accurately, we recommend using two or more Pumpbag inflatable cushions, which you inflate at the sides between the frame and the wall until the frame is centred.

Step 4: Align
Place a spirit level on the frame and adjust the level screws with the adjustment tool until the frame is straight.

Step 5: Fix the frame
Now it is time to fix the frame! Use a TX25 bit.
Fixing the frame into a hard or porous material?
If you are fixing the frame into concrete, lightweight concrete, expanded clay aggregate concrete, brick or hollow brick, you must insert a plug before driving in the frame screw.
Fixing the frame into wood?
When fixing into wood you do not need a plug and can drive the frame screw in directly.
When driving the frame screw through the holes in the frame, make sure that the teeth under the screw head bite into the frame material. The teeth grip the frame and make it possible to adjust it afterwards. For a secure installation, also make sure that the screw reaches at least 45 mm into the load-bearing material of the wall.

Step 6: Fine-tune with the frame screw
If the frame is not straight once all the screws are in, you can easily align it by screwing the frame screw in or out. Thanks to the teeth under the screw head, the frame moves together with the screw as you turn it. Use a spirit level to check both the horizontal and the vertical position.

Step 7: Cover the holes with cover caps
Once all the frame screws are in and the frame is straight and centred, cover the holes in the frame with cover caps. The cover caps come in several colours, so the fixing will be discreet whatever the colour of the window.
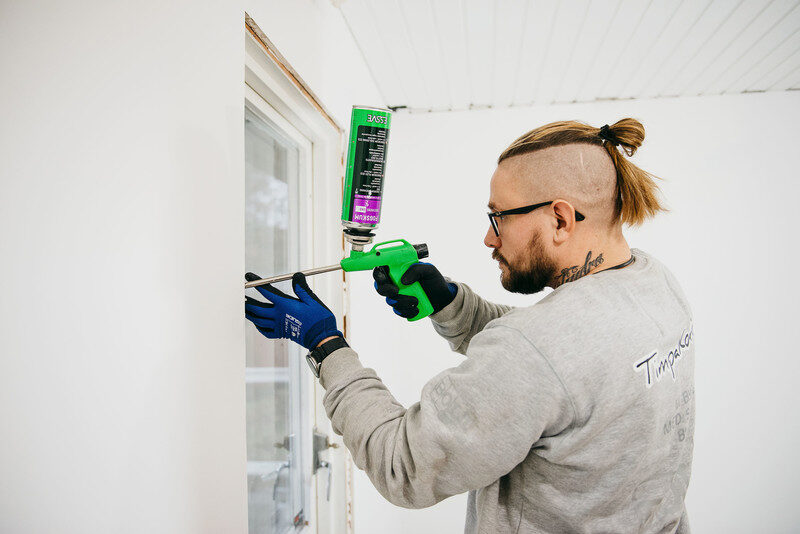
Step 8: Insulate the gap
Fill the gap between the wall and the frame with gun foam. We recommend Expand gun foam, with an isocyanate content below 0.1%, which provides good sound damping and thermal insulation. It adheres to most materials, e.g. wood, metal, concrete, stone, foam plastics and extruded polystyrene.
Isocyanates – mandatory training!
Because working with isocyanates carries a risk of allergy, since 24/8/2023 anyone who works industrially or professionally with products containing 0.1% or more diisocyanates by weight, or who supervises such work, must complete training. The obligation arises from Commission Regulation (EU) 2020/1149 (REACH, Annex XVII, entry 74). More about isocyanates and mandatory training
Products needed for installation
Choose the frame screw L with a sharp point or a drill point depending on the material you are fixing the frame into.
 ESSVE Frame screw L, with sharp point for wood and concrete 6.0 x 90 mm EZP, pack of 100
 ESSVE Frame screw L with drill point for steel 6.0 x 80 mm EZP, pack of 8
 ESSVE Level screw for frame installation 7.0 x 65 mm EZP, pack of 2
 ESSVE Installation and adjustment key KMN 100 mm
 ESSVE Pumpbag, inflatable installation aid
More frame installation guides

Programa Plus for wood
A flexible system that lets you easily install, and also later adjust, windows and doors in older houses where conditions are not ideal.

Programa Plus for hollow brick
A flexible system that lets you easily install, and also later adjust, windows and doors in older houses where conditions are not ideal.

Programa Plus for concrete/solid brick
A flexible system that lets you easily install, and also later adjust, windows and doors in older houses where conditions are not ideal.

Frame sleeve Indu-Prog
The installation system with the Indu-Prog frame sleeve performs excellently whatever material the frame is made of.
Did you know...
... that the frame screw was invented in the early 1970s by a carpenter from Karlskrona? ESSVE bought the patent, and until 1989 we were the only manufacturer of this product.
The information in this guide is for guidance only. Follow the manufacturer's technical data sheet and the applicable standards; if in doubt, contact us.